Java Thread Local Test Appium Driver Pom Example
How to run Appium Tests in Parallel with Cucumber and TestNG? Yes, in this post, I will show you how we can achieve this! I will explain to you a mobile test automation project that contains TestNG, Appium, Cucumber. In this project, you can do your modifications to write your mobile test automation tests and run them in parallel. Before starting this article, I highly suggest you, check the below appium articles. I will extend Appium Parallel Testing architecture and add the cucumber support in this article.
- Step by Step Appium Tutorial
- Appium Parallel Testing and How to Setup a Wireless Device Lab
- Appium Parallel Testing on Multiple Emulators
Cucumber IntelliJ Plugins
In order to add Appium Cucumber support to our project in IntelliJ IDEA, we need to install " Gherkin " and " Cucumber for JAVA " plugins. You will download and then go to settings -> plugins and then install these plugins.


Here, you can find also details: IntelliJ Cucumber Support
Cucumber Dependencies
After this step, you need to add the below Cucumber Dependencies to your pom.xml.
<?xml version="1.0" encoding="UTF-8"?> <project xmlns="http://maven.apache.org/POM/4.0.0" xmlns:xsi="http://www.w3.org/2001/XMLSchema-instance" xsi:schemaLocation="http://maven.apache.org/POM/4.0.0 http://maven.apache.org/xsd/maven-4.0.0.xsd"> <modelVersion>4.0.0</modelVersion> <groupId>org.example</groupId> <artifactId>appium-parallel-tests</artifactId> <version>1.0-SNAPSHOT</version> <properties> <maven.compiler.source>11</maven.compiler.source> <maven.compiler.target>11</maven.compiler.target> <appium-java-client-version>7.5.1</appium-java-client-version> <selenium-java-version>3.141.59</selenium-java-version> <testng-version>7.4.0</testng-version> <lombok-version>1.18.20</lombok-version> </properties> <dependencies> <!-- https://mvnrepository.com/artifact/io.appium/java-client --> <dependency> <groupId>io.appium</groupId> <artifactId>java-client</artifactId> <version>${appium-java-client-version}</version> <scope>test</scope> </dependency> <!-- https://mvnrepository.com/artifact/org.seleniumhq.selenium/selenium-java --> <dependency> <groupId>org.seleniumhq.selenium</groupId> <artifactId>selenium-java</artifactId> <version>${selenium-java-version}</version> <scope>test</scope> </dependency> <!-- https://mvnrepository.com/artifact/org.testng/testng --> <dependency> <groupId>org.testng</groupId> <artifactId>testng</artifactId> <version>${testng-version}</version> <scope>test</scope> </dependency> <!-- https://mvnrepository.com/artifact/org.projectlombok/lombok --> <dependency> <groupId>org.projectlombok</groupId> <artifactId>lombok</artifactId> <version>${lombok-version}</version> <scope>provided</scope> </dependency> <!-- https://mvnrepository.com/artifact/io.cucumber/cucumber-java --> <dependency> <groupId>io.cucumber</groupId> <artifactId>cucumber-java</artifactId> <version>6.10.3</version> </dependency> <!-- https://mvnrepository.com/artifact/io.cucumber/cucumber-jvm --> <dependency> <groupId>io.cucumber</groupId> <artifactId>cucumber-jvm</artifactId> <version>6.10.3</version> <type>pom</type> </dependency> <!-- https://mvnrepository.com/artifact/io.cucumber/cucumber-core --> <dependency> <groupId>io.cucumber</groupId> <artifactId>cucumber-core</artifactId> <version>6.10.3</version> </dependency> <!-- https://mvnrepository.com/artifact/io.cucumber/gherkin --> <dependency> <groupId>io.cucumber</groupId> <artifactId>gherkin</artifactId> <version>18.1.1</version> </dependency> <!-- https://mvnrepository.com/artifact/io.cucumber/cucumber-testng --> <dependency> <groupId>io.cucumber</groupId> <artifactId>cucumber-testng</artifactId> <version>6.10.3</version> </dependency> <!-- https://mvnrepository.com/artifact/io.cucumber/cucumber-picocontainer --> <dependency> <groupId>io.cucumber</groupId> <artifactId>cucumber-picocontainer</artifactId> <version>6.10.3</version> </dependency> <!-- https://mvnrepository.com/artifact/net.masterthought/cucumber-reporting --> <dependency> <groupId>net.masterthought</groupId> <artifactId>cucumber-reporting</artifactId> <version>5.5.3</version> </dependency> </dependencies> </project> Cucumber Files and Folders
Then, I created a cucumber package and under this package, I created below packages and files:
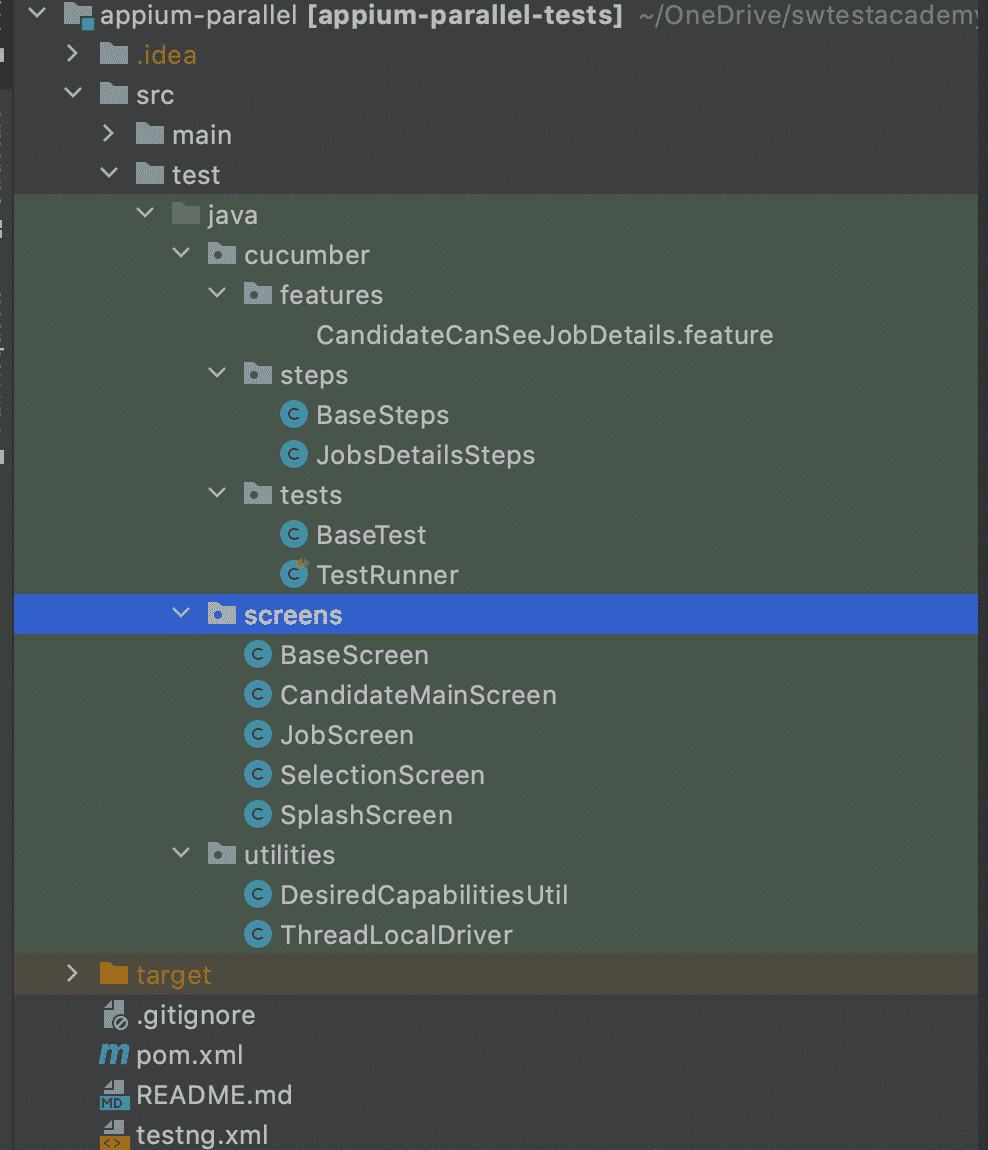
- In the features package, we will hold all of our feature files.
- In the steps package, we will write the steps of our features. BaseSteps file is a common/base file of all steps files.
- In the tests package, we will have cucumber test classes.
I will explain the details of the above package and files. ;)
Appium Cucumber Parallel Test Automation with TestNG Scenario
Our test scenario is a successful login of isinolsun application.
I will share some classes' codes below but you can find the project code here: https://github.com/swtestacademy/appium-parallel-tests/tree/appium-cucumber-testng-parallel-testing
In the feature file, we should write our scenario in Gherkin syntax.
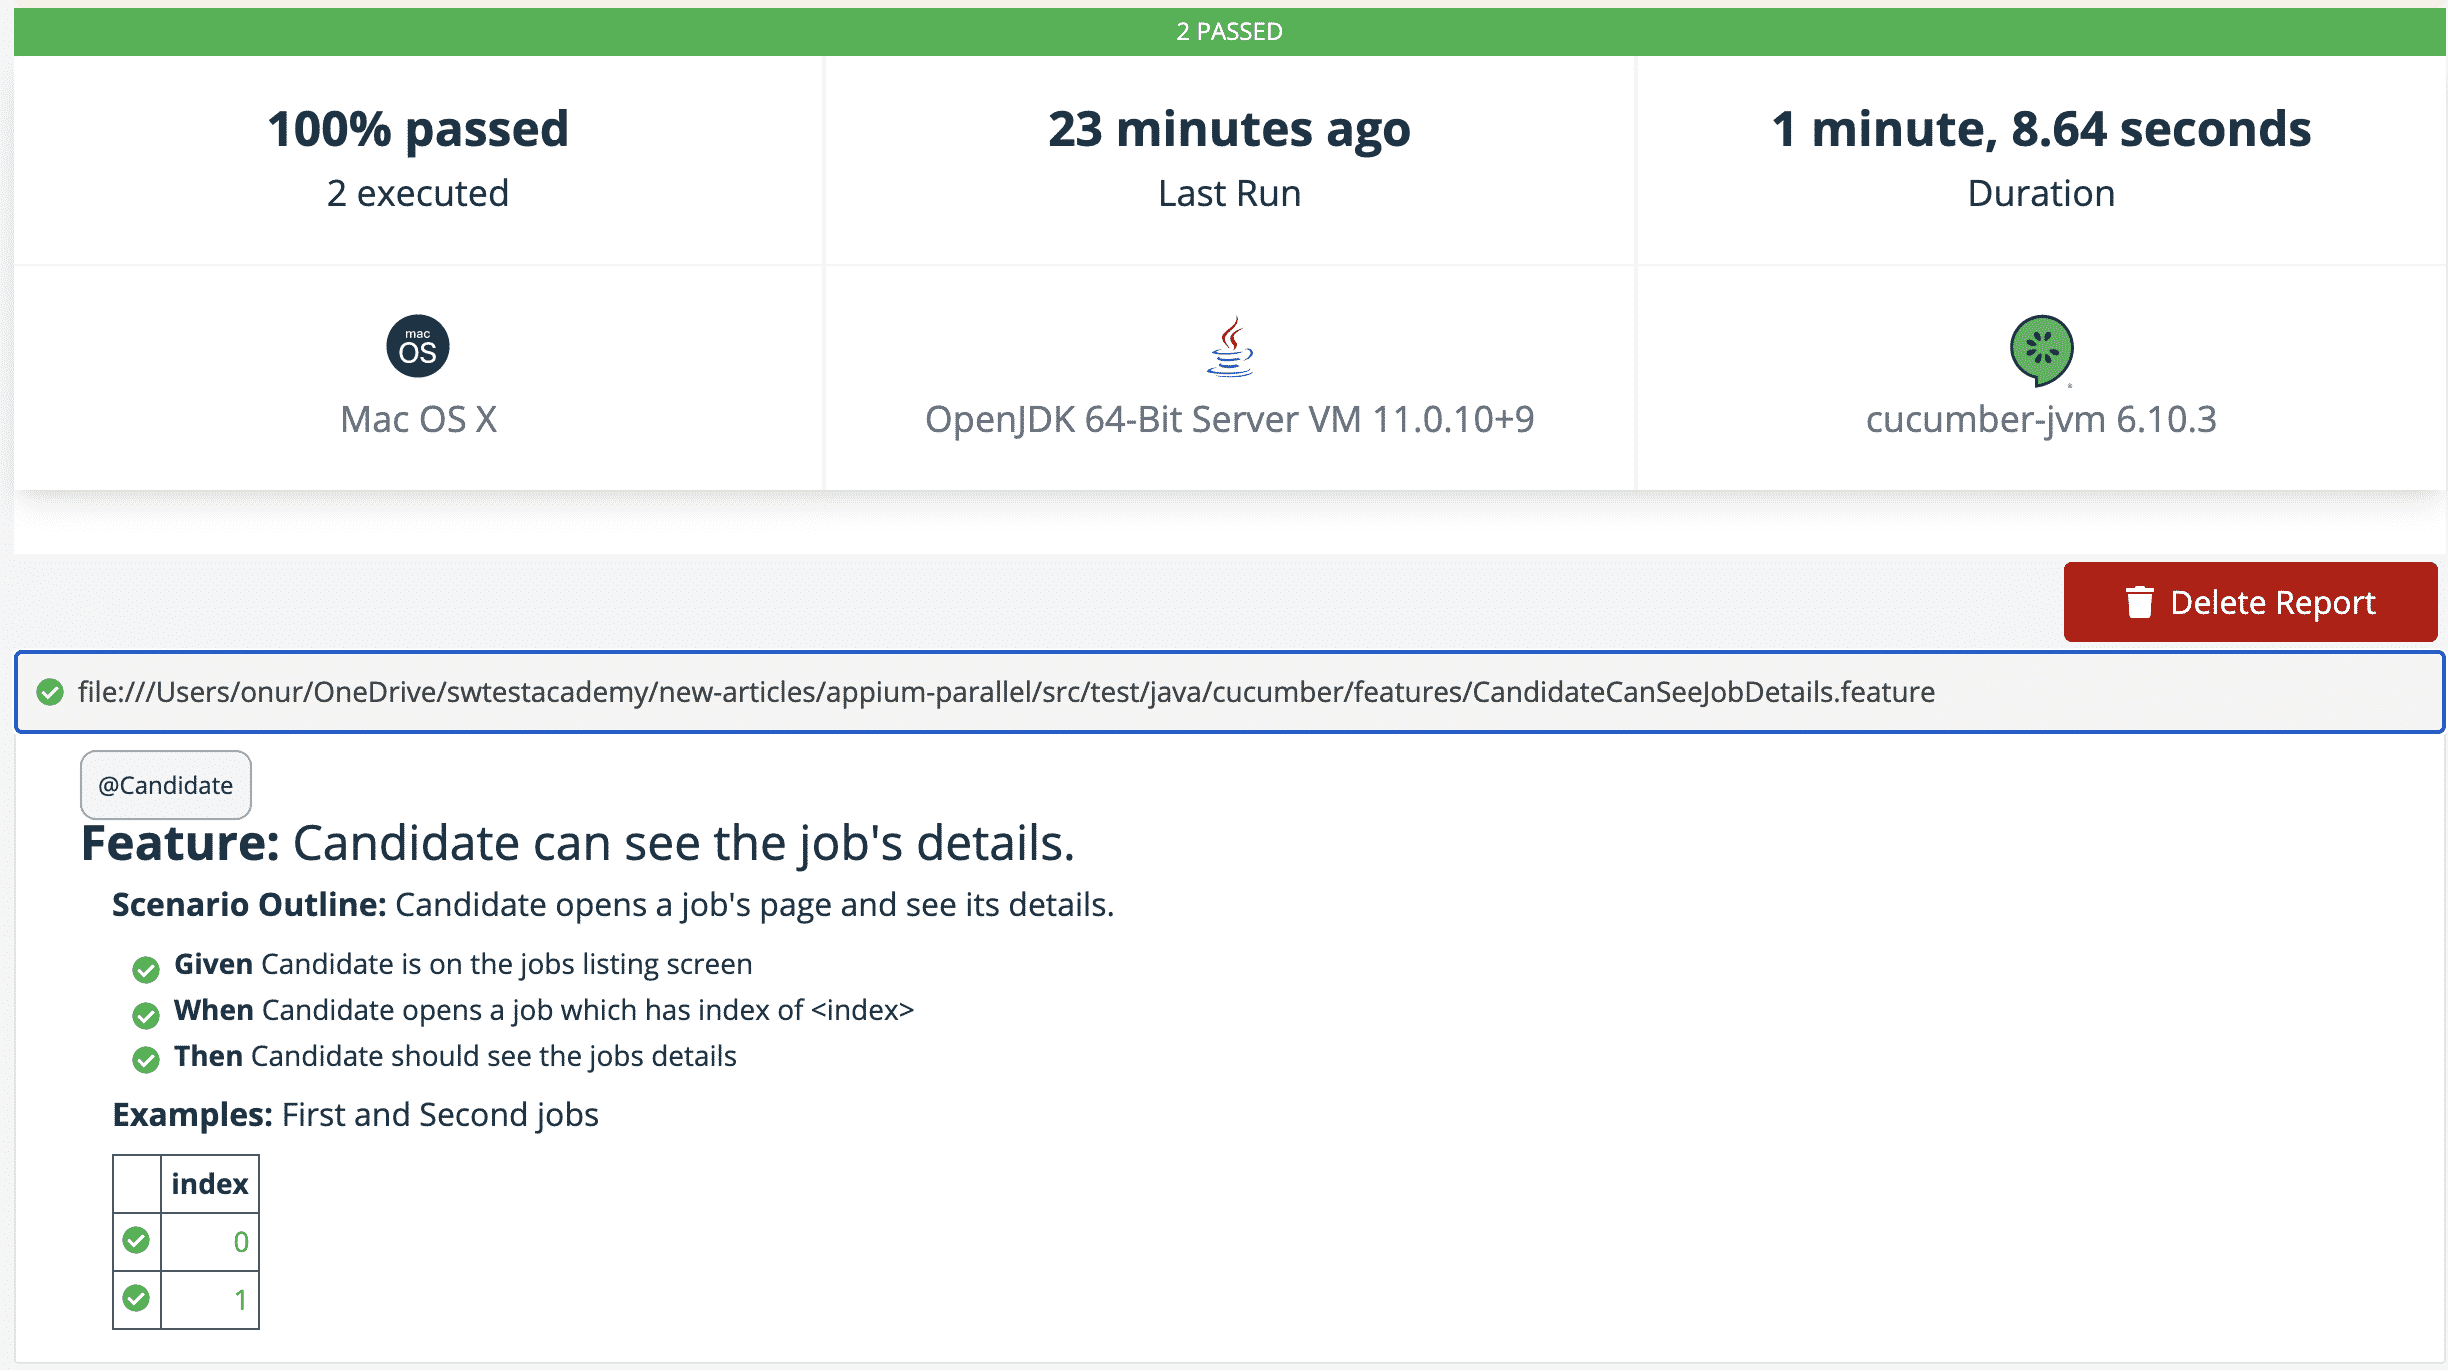
@Candidate Feature: Candidate can see the job's details. Scenario Outline: Candidate opens a job's page and see its details. Given Candidate is on the jobs listing screen When Candidate opens a job which has index of <index> Then Candidate should see the jobs details Examples: First and Second jobs | index | | 0 | | 1 |
BaseSteps file is the base class of all steps files. In this class, we declared all common variables and functions for all steps files.
public class BaseSteps { protected SplashScreen splashScreen; protected SelectionScreen selectionScreen; protected CandidateMainScreen candidateMainScreen; protected JobScreen jobScreen; public void setupScreens(AndroidDriver<MobileElement> driver) { splashScreen = new SplashScreen(driver); selectionScreen = new SelectionScreen(driver); candidateMainScreen = new CandidateMainScreen(driver); jobScreen = new JobScreen(driver); } } We need to write the detailed actions in the steps file. In the JobsDetailsSteps file, I wrote all actions related to our steps.
public class JobsDetailsSteps extends BaseSteps { @Before public void setupLoginSteps() { setupScreens(ThreadLocalDriver.getTLDriver()); } @Given("Candidate is on the jobs listing screen") public void candidateIsOnTheJobsListingScreen() { splashScreen.skipSplashScreen(); selectionScreen.clickIamSearchingJob(); candidateMainScreen.allowNotification(); } @When("Candidate opens a job which has index of {int}") public void candidateOpensTheIndexOfJobScreen(int index) { candidateMainScreen.clickToJob(index); } @Then("Candidate should see the jobs details") public void candidateShouldSeeTheJobsDetails() { jobScreen.assertToolBarTitleIsExpected(); } } and now it is time to write our test runner file. In the below test file, we will run all features and generate cucumber reports. If you want, you can also modify this class to run specific cucumber features.
@CucumberOptions( monochrome = true, tags = "@Candidate", features = "src/test/java/cucumber/features", glue = "cucumber.steps", publish = true ) public class TestRunner extends BaseTest { private TestNGCucumberRunner testNGCucumberRunner; @BeforeClass(alwaysRun = true) public void setUpClass() { testNGCucumberRunner = new TestNGCucumberRunner(this.getClass()); } @Test(groups = "cucumber", description = "Run Cucumber Features.", dataProvider = "scenarios") public void scenario(PickleWrapper pickleWrapper, FeatureWrapper featureWrapper) { testNGCucumberRunner.runScenario(pickleWrapper.getPickle()); } @DataProvider public Object[][] scenarios() { return testNGCucumberRunner.provideScenarios(); } @AfterClass(alwaysRun = true) public void tearDownClass() { testNGCucumberRunner.finish(); } } In BaseTest class, we do test setup and teardown operations.
public class BaseTest { private final DesiredCapabilitiesUtil desiredCapabilitiesUtil = new DesiredCapabilitiesUtil(); @BeforeMethod @Parameters({ "udid", "platformVersion" }) public void setup(String udid, String platformVersion) throws IOException { DesiredCapabilities caps = desiredCapabilitiesUtil.getDesiredCapabilities(udid, platformVersion); ThreadLocalDriver.setTLDriver(new AndroidDriver<>(new URL("http://127.0.0.1:4444/wd/hub"), caps)); } @AfterMethod public synchronized void teardown() { ThreadLocalDriver.getTLDriver().quit(); } } We have also two utility classes. One of them is for DesiredCapabilities.
public class DesiredCapabilitiesUtil { public DesiredCapabilities getDesiredCapabilities(String udid, String platformVersion) { DesiredCapabilities desiredCapabilities = new DesiredCapabilities(); desiredCapabilities.setCapability("udid", udid); desiredCapabilities.setCapability("platformVersion", platformVersion); desiredCapabilities.setCapability("platformName", "Android"); desiredCapabilities.setCapability("appPackage", "com.isinolsun.app"); desiredCapabilities.setCapability("appActivity", "com.isinolsun.app.activities.SplashActivity"); desiredCapabilities.setCapability("skipUnlock", "true"); desiredCapabilities.setCapability("noReset", "false"); return desiredCapabilities; } } and one is for ThreadLocal Driver.
public class ThreadLocalDriver { private static final ThreadLocal<AndroidDriver<MobileElement>> tlDriver = new ThreadLocal<>(); public static synchronized void setTLDriver(AndroidDriver<MobileElement> driver) { tlDriver.set(driver); } public static synchronized AndroidDriver<MobileElement> getTLDriver() { return tlDriver.get(); } } And we should change our TestNG XML file as shown below for parallel execution.
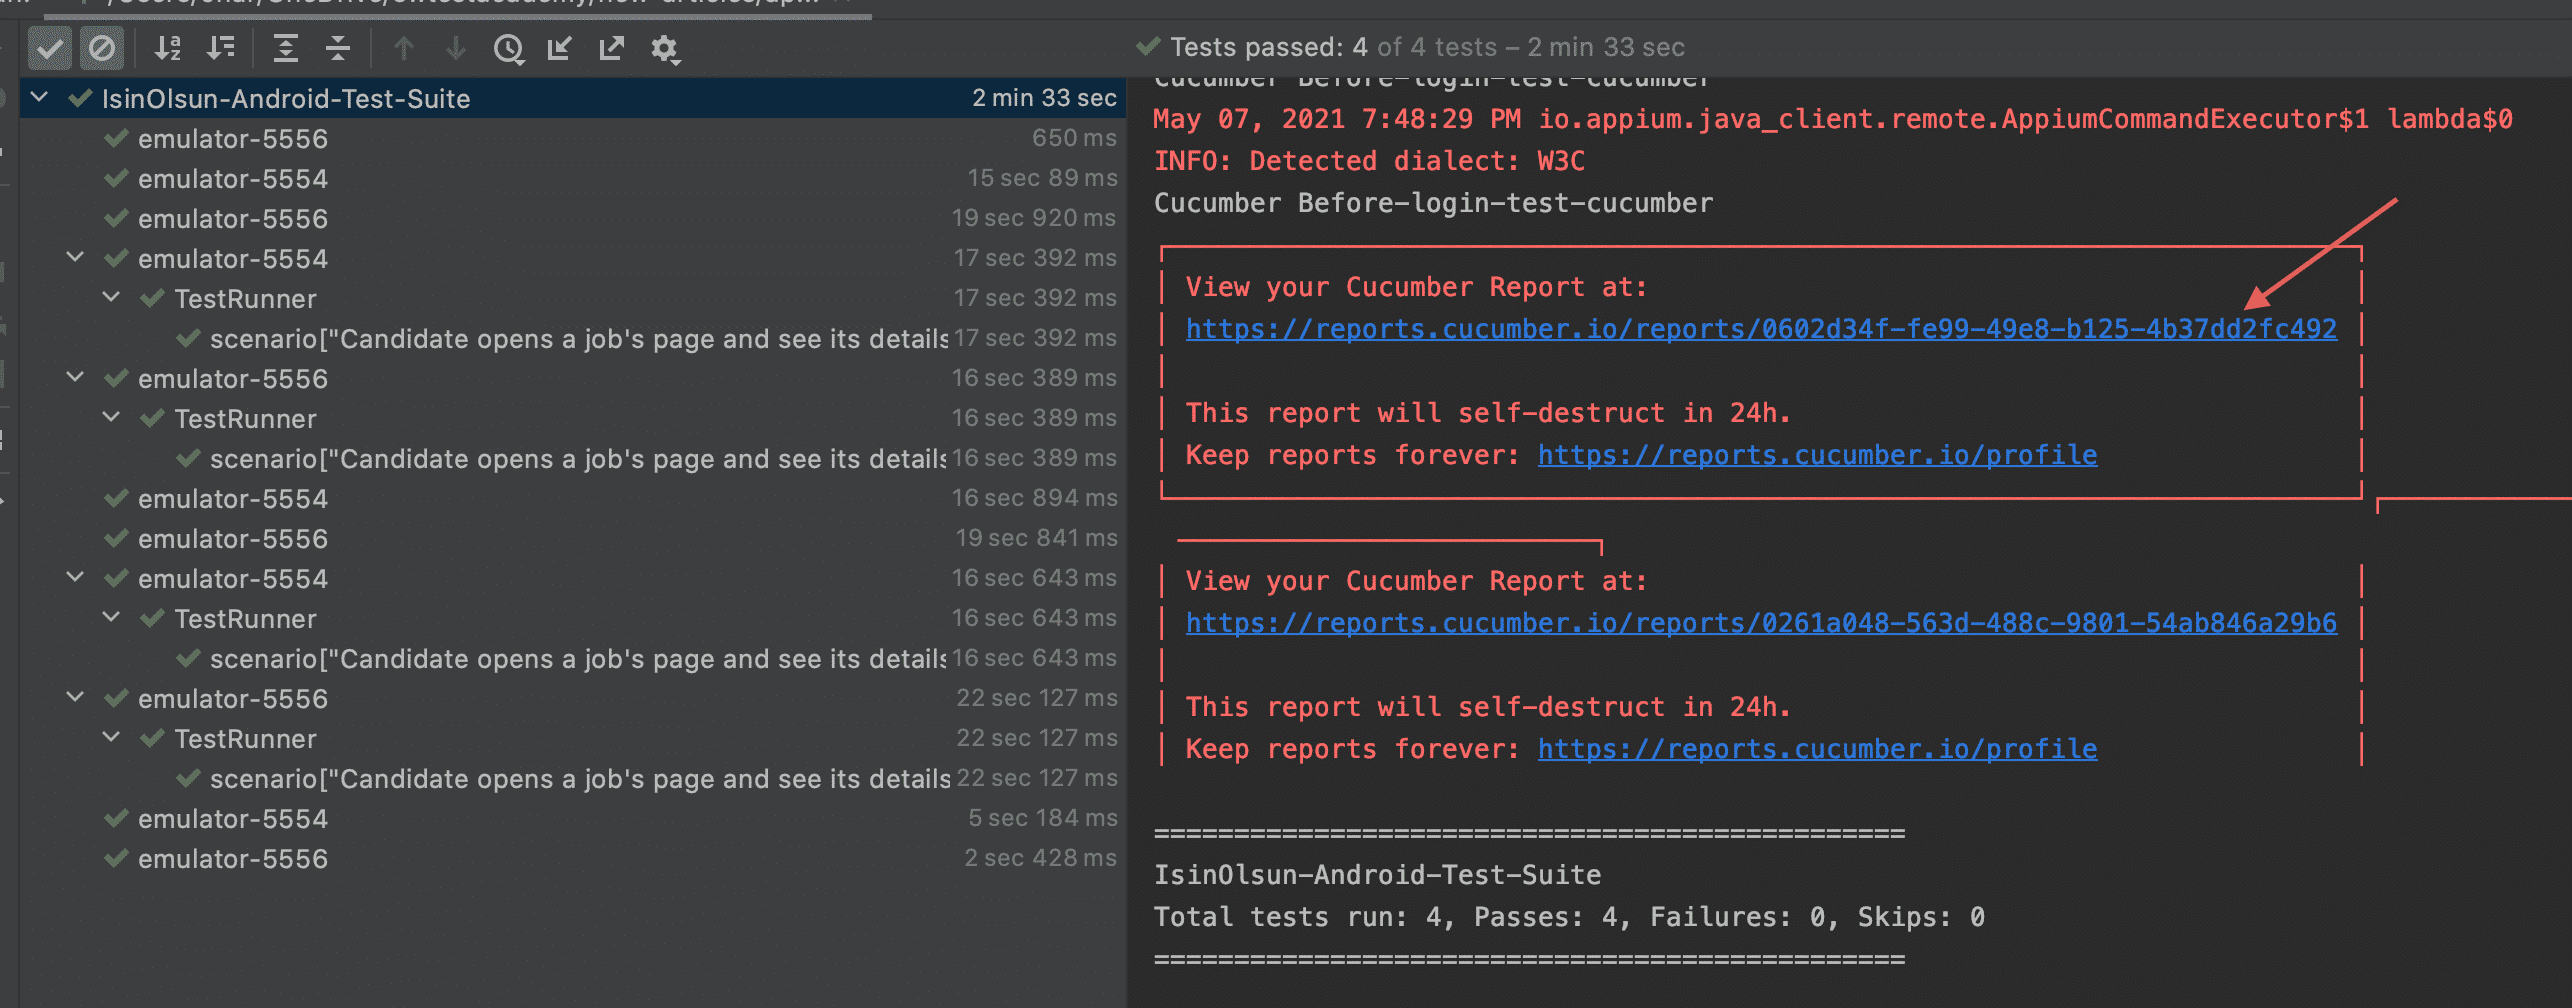
<?xml version="1.0" encoding="UTF-8"?> <!DOCTYPE suite SYSTEM "http://testng.org/testng-1.0.dtd"> <suite name="IsinOlsun-Android-Test-Suite" parallel="tests" thread-count="2"> <test name="emulator-5554"> <parameter name="udid" value="emulator-5554"/> <parameter name="platformVersion" value="11"/> <classes> <class name="cucumber.tests.TestRunner"/> </classes> </test> <test name="emulator-5556"> <parameter name="udid" value="emulator-5556"/> <parameter name="platformVersion" value="11"/> <classes> <class name="cucumber.tests.TestRunner"/> </classes> </test> </suite>
When you run the TestNG.xml file, your mobile tests run in parallel. In this framework, you can both use Page Object Model and Cucumber together with TestNG. You can find the other files on the GitHub project page.
And you can go and see the reports after the test execution.
Youtube Demo Video
Github Project
https://github.com/swtestacademy/appium-parallel-tests/tree/appium-cucumber-testng-parallel-testing
I hope you like this post. I would like to hear your feedback. Please share your comments with us.
Thanks.
Onur Baskirt

Onur Baskirt is a senior IT professional with 15+ years of experience. Now, he is working as a Senior Technical Consultant at Emirates Airlines in Dubai.
Source: https://www.swtestacademy.com/appium-cucumber-parallel-test-execution/
0 Response to "Java Thread Local Test Appium Driver Pom Example"
Postar um comentário